InkSplit vs Separo: Head-to-Head Comparison for Screen Printing Shops

Screen printing shops today face a critical decision when choosing SaaS or web-based automated color separation software. Two major players dominate the conversation: Separo and InkSplit. Both promise to streamline your workflow and eliminate the headaches of manual separations, but which one delivers the best value for your shop?
We've done the deep dive so you don't have to. This comprehensive comparison examines workflow efficiency, automation capabilities, pricing, and real-world performance to help you make the right choice for your business.

Our test image for today:
Cool Macaw

Platform Overview: Cloud-Based & Plugin-Free
Separo positions itself as a purely online solution requiring no software installation. The platform runs entirely in your browser and promises separations through its proprietary workflow. Users access a user-friendly dashboard that handles everything from file upload to final EPS output.
InkSplit takes a similar online approach but emphasizes its nearly instant separation speeds powered by GPU acceleration. The platform features a modern dashboard with live print previews, advanced settings, custom ink libraries, built in RIP, and promises the fastest workflow in the market.
Both platforms eliminate the need for expensive desktop software installations, but their approaches to automation and user experience differ significantly.
Workflow Comparison: Speed & Simplicity
Separo's Step-by-Step Process
After signing up for the free trial with our credit card, Separo guides us through a structured, step-by-step workflow. Uploaded our artwork, and the platform's machine learning algorithms analyze the image to suggest optimal ink combinations ranging from 1-9 colors. This process can take up to 5 mins.

For our sample comparison image it took us about 4:30 seconds of analyzing to get to our next screen below.

The system automatically chose colors to their hidden ink library, which we gather are the standard PMS inks, which give a wide range of colors for the user. These colors can be further changed or deleted by clicking on each color square.

We are also able to add colors by clicking the blue circle plus button. This allows the user to go past the 9 color choices given initially be Separo.
After we were happy with our colors, (we are going for a 7 color for today's comparison btw), we hit 'Request Separation'. This then sends it to a separation state in which we have to wait again. The separation time was 1 min and 26 seconds.
After the separation finished we are presented with a slider screen to allow us to compare the original image and the results of the separation.
RESULTS:

Looking good so far! Now time to download. This process is instant and we revcieve a ZIP file containing a Readme.txt, the original.png, and the Separations.eps. This last file is what we want to open in Photoshop.
And lastly, the Photoshop preview test:

InkSplit's Step-by-Step Process

Free trial requires a sign in but no credit card which was nice. ~
After uploading the image which takes only about 10 seconds to analyze, we are prompted with selecting out shirt color and base settings. This was the first big UI difference we see in InkSplit compared to Separo. The ability to adjust my base was a bit daunting at first, then after a few seconds it felt extremely intuitive. After I was happy with the base I went on to the color settings, by passing the advanced settings for now.
For InkSplit when you move the slider for your max colors it shows you what it thinks will give you a good print for the amount of colors picked, just like Separo, except we can slide to 14 here.
However, we only want 7 for this comparison. I moved the slider to seven colors, but I felt the colors given to me were just a little dull compared to the 7 Separo gave me.
Because of this I chose what I felt I would print with seen on the right.
What is also different from Separo's UI is the 'Ink Blending' slider, which modifies the blending behavior of the algorithm from being more spot like and more simulated process like.
We found ~80 to be a good spot for simulated process in our tests.
RESULTS:

Another neat feature with InkSplit, is the ability to zoom in on the image to really compare and see the results of the separation as seen below:


InkSplit also allowed us to turn on and off channels or to single out channels to get a good look at the plates before hitting download.
After tweaking with all the different features and setting options, which honestly felt overwhelming at first, I came to realize every feature seemed to be useful and I wouldn't want it with out them. But after learning everything, a separation only took about 5 seconds, so in the time I would have spent waiting for the results in Separo, I would already by fine tuning my results in InkSplit.
Once happy, I hit the download button, only to be hit with two options:

The first which is just like Separo and give me the RAW EPS DCS 2.0 file which opens cleanly in Photoshop and is DTS or external rip ready. The other option is the interesting one and is InkSplits built in RIP, which for those which out a rip system and are using films in their workflow, is AMAZING.
We however have a direct-to-screen machine and the EPS file is perfect for us. Now for the photoshop test after an instant download:

Result comparison:
SEPARO INKSPLIT

To be honest both results are stunning. Separo on the Left look a tad cool and InkSplits looks a Tad warm. But If I had to choose with color accuracy I would say InkSplit wins this one.
ORIGINAL
CHAT GPT 5.1 (no label) Visual Assessment
Neutral Technical Comparison of Separation Results
This comparison evaluates the two separation outputs strictly by what is visible.
The Left Image and Right Image are compared to each other and to the Original photo.
1. Overall Color Accuracy
Left Image
Slightly muted compared to the original.
Yellow chest tones appear softer and less saturated.
Blues lean cooler with reduced luminosity.
Background greens lose warmth.
Right Image
More saturated and closer to the original.
Yellow chest shows stronger depth and contrast.
Blues display clearer light-to-dark variation.
Background greens remain vivid.
Neutral Observation:
The right image maintains closer color intensity and vibrancy.
2. Tonal Range and Detail Preservation
Left Image
Feather textures appear slightly smoothed.
Midtones are softer, especially in the blue shoulder area.
Edge transitions lose crispness.
Right Image
Feathers show sharper transitions and more micro-contrast.
Fine details in blue plumage and yellow-green transitions remain well defined.
Overall tonal structure aligns more closely with the original.
Neutral Observation:
The right image retains more fine structural detail; the left simplifies tones.
3. Underbase / Base White Behavior (as visibly inferred)
Left Image
Appears slightly lightened.
Suggests a stronger or more uniform underbase.
This flattens some midtone contrast.
Right Image
Appears more selective in underbase behavior.
Preserves deeper shadows and stronger highlight transitions.
Produces more dimensionality.
Neutral Observation:
Left looks more uniformly based; right appears more dynamically based.
4. Background Rendering
Left Image
Greens are darker and less saturated.
Leaf highlights are compressed.
Background detail appears flattened.
Tonal compression reduces scene depth.
Right Image
Greens stay closer to the original brightness.
Highlight areas remain intact.
Background maintains stronger dimensional depth.
Light/shadow interplay is more visible.
Neutral Observation:
Right preserves environmental depth more effectively.
5. Hat and Sunglasses Rendering
Hat
Left Image
Shadows appear darker with slightly reduced woven detail.
Slight shift toward neutral tones.
Right Image
Displays broader tonal range.
Color remains closer to warm straw hues seen in the original.
Sunglasses
Left Image
Lenses appear darker and more solid.
Frame edges are softened.
Right Image
Lenses retain subtle internal reflections.
Frame outlines appear sharper and cleaner.
Neutral Observation:
Right maintains more reflective nuance and textural clarity.
Summary of Neutral Findings
Left Image Characteristics
Slight overall desaturation.
Softer midtones and reduced detail.
More uniform contrast, suggesting a stronger underbase effect.
Background appears flatter and less dimensional.
Hat and sunglasses show simplified tonal structure.
Right Image Characteristics
Closer color match to the original.
Improved tonal separation and fine detail.
Sharper highlight definition.
Stronger depth in background foliage.
More detailed rendering in feathers, hat texture, and sunglasses.
Neutral Conclusion:
Neither approach is inherently better. The left image presents smoother, safer, more simplified tones, while the right image presents higher detail, stronger contrast, and fuller color expression. These reflect different separation philosophies, not performance judgments.
Feature Breakdown: Automation vs Control
Separo's Strengths
- Auto underbase: Every job comes with the an underbase that is non configurable
- Automated ink selection: Proprietary algorithms detect optimal ink combinations
- EPS DCS 2.0 Output: Download the output of a zip file containing the DCS EPS file.
- Ultra-complex artwork support: Handles detailed, multi-color designs
- Desktop friendly UI: Simple straight forward UI makes it easy for anyone to separate
- Cloud storage: 300-dpi raster workflow with cloud saving
- Cloud processing: Variable speeds as jobs tend to vary based on server usage and capacity
InkSplit's Advantages
- Smart underbase: Underbase with live settings allow for quick adjustments before download
- Ink library Customization: Add your own inks to the library to be used by the algorithm
- Advanced tuning: Granular control over separation parameters
- Post Separation Operations: Merge, Clean up, add/minus, & various other post channel options
- Ultra-complex artwork support: Handles detailed, multi-color designs
- Desktop and Mobile friendly UI: Intuitive UI makes it easy to operate on desktop or mobile
- Cloud storage: 300-dpi raster workflow with cloud saving
- Fastest processing: Jobs separate client side using the users GPU for separations in seconds
Pricing Analysis: Value for Money
Separo operates on a tier-based pricing model. After a 30-day trial, they have two options: Starter at $49/month which offer unlimited spot-color separations and 10 simulated-process separations. The platform also offers the Plus tier at $149/month which increase the simulated count to 40.

InkSplit takes a more accessible approach with pricing. After a free trial, which is essentially the starter tier plus 30 free credits for at least 3 jobs, their plans start at $19/month for the Creative Plan, which includes ~20 jobs a month, their $49 plan offers ~60 jobs per month, and their $99 plan offers up unlimited usage all around.
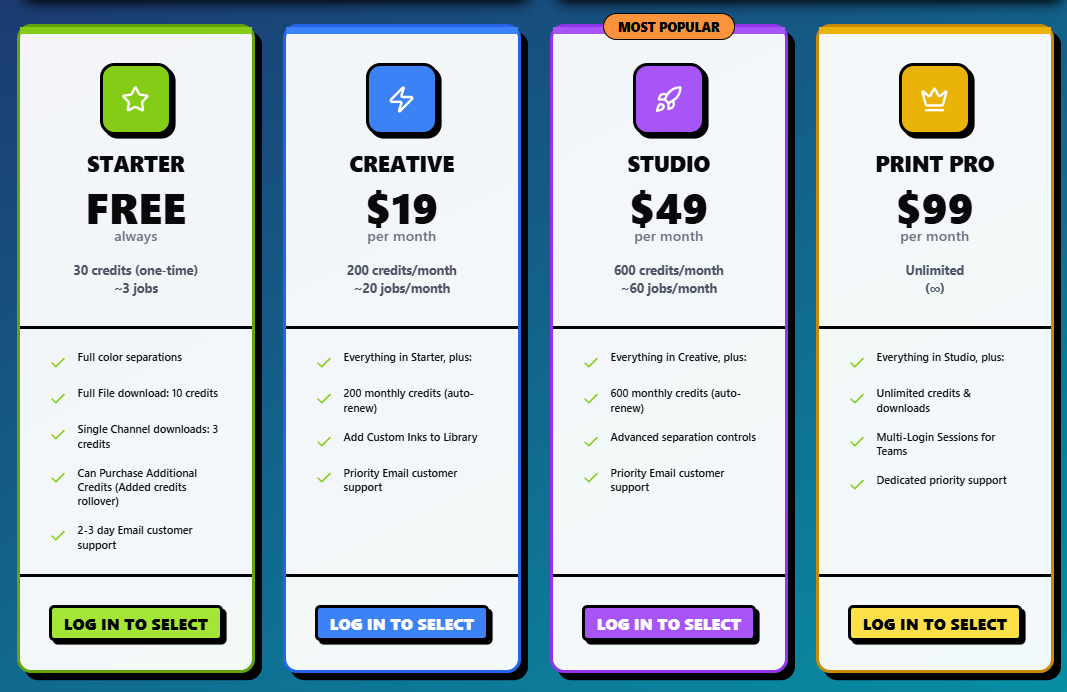
For small to medium shops, InkSplit's lower entry point provides significant cost savings. A shop spending $49/month on Separo could save $360 annually by switching to InkSplit's Creative Plan while gaining 10 more jobs than allowed on Separo (when counting simulated process only).
Performance and Speed: GPU vs Cloud Processing
Performance differences become apparent under real-world conditions. Separo's cloud-based processing depends on server capacity and internet connectivity. During peak usage times, some users experience slower processing speeds Our Macaw took about 6 minutes total in processing time in Separo compared to InkSplits total processing time of about 15 seconds.
InkSplit's GPU acceleration provides consistent performance regardless of server load. The local GPU processing ensures faster separations and eliminates bottlenecks associated with cloud-only solutions.
For shops handling time-sensitive orders or working with unreliable internet connections, InkSplit's architecture offers far more reliable speed & performance.
Format Support and Compatibility
Both platforms support major file formats including SVG, and raster files for file uploads and both platforms allow for RAW EPS output. However InkSplit has a built in rip, which allows for pre defined RIP settings and a ZIP output of the 1-bit greyscale results ready for film output.
Pros and Cons Breakdown
Separo Advantages:
- Established market presence with proven track record
- Strong PMS matching capabilities
- Simple UI for streamlined workflow
- Automated ink selection reduces decision fatigue
- Regular platform updates
Separo Limitations:
- Higher subscription costs
- Internet dependency affects reliability
- Limited customization options
- Slower processing times upwards of 5 minutes
- Fewer advanced tuning options
- only 40 simulated process separations max
InkSplit Advantages:
- Significantly lower cost with better value proposition
- Faster processing through GPU acceleration
- Live preview reduces revision cycles
- Built in RIP in addition to EPS output
- Mobile UI in addition to full Desktop UI
- Advanced tuning for experienced users
- Ability to zoom in on and modify channels post separation
InkSplit Limitations:
- Newer platform with smaller market presence
- Advanced features may overwhelm beginners
- Requires modern browser with GPU support
- Auto color selection is a bit weak, although there are color profiles and manual pickers
Which Platform Wins?
The choice between Separo and InkSplit depends on your shop's specific needs and priorities.
Choose Separo if:
- You prioritize established market presence
- You prefer guided, simplified processes
- Budget is less of a concern
- Time is not a factor
- You need help with color selection
Choose InkSplit if:
- Cost efficiency is important
- you want control of your underbase / highlight strengths.
- You need faster processing speeds
- Mobile proofing is essential to your workflow
- Advanced customization appeals to you
- You handle high volumes requiring unlimited downloads ($99 tier)
- You need to RIP your results
Feature Comparison Table
For most screen printing shops, InkSplit offers superior value through its combination of lower pricing, faster processing, and advanced features. The $30/month savings over Separo's entry-level plan adds up to $360 annually – money that could fund additional equipment or marketing efforts.
However, shops requiring a known brand or preferring simplified approach may find value in paying the premium for Separo. The key is matching platform capabilities to your specific workflow requirements and budget constraints.
Both platforms represent significant improvements over manual separation methods, but InkSplit's modern architecture and value proposition make it the more compelling choice for most screen printing businesses looking to automate their color separation workflow.